IPM Photography Tips
Althought most photography utilizes smart phones with built-in cameras, standard cameras provide more flexibility than phone cameras. This "tips" article has focused on standard camera features, but the information also applies to in-phone cameras.
Reasonably priced digital cameras and inexpensive photo software have brought digital imaging into the grasp of every turf manager -- whether they are golf course superintendents, sports field managers, or students. The only thing that stops us from unleashing the power that digital photography has to improve our communications, our record keeping and our jobs is that we need to turn our cameras on and start taking pictures. This short tutorial will describe how to take photographs successfully and what steps are needed to prepare images for use on the web.
Selecting a camera
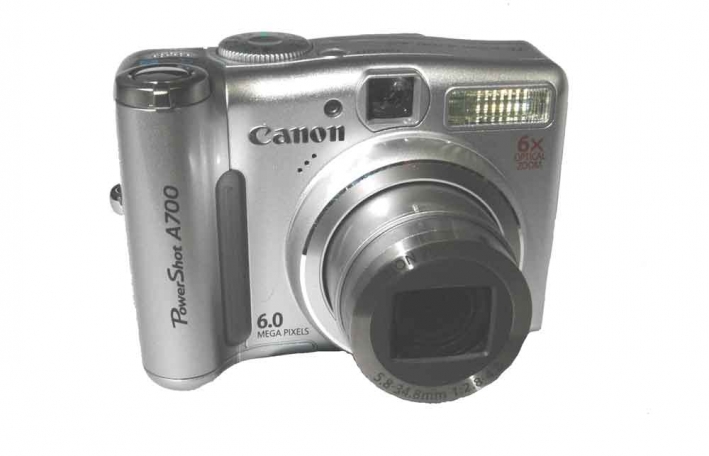
We recommend that you select a camera from one of the following manufacturers: Canon, Nikon, Sony, Fuji and Olympus. The camera should have the following features:
- Macro capability
- Manual control for focus, aperture, shutter speed, and ISO
- At least a 4 mega pixel sensor
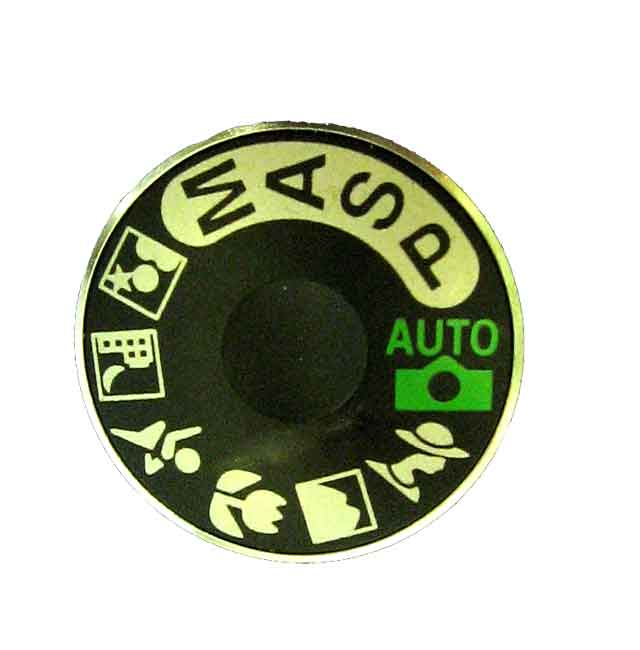
Camera controls (see photo to right) should include:
- M = Manual: allows you to select shutter and aperture
- A = Aperture priority: you adjust the aperture
- S = Shutter priority: you adjust the shutter speed
- Flower symbol: macro close-up photography
Almost all digital cameras also include A (automatic) and/or P (program) controls as well. These settings are best for quick "point and shoot" photos.
Storing and Naming Photos
The most popular format for storing and exchanging photographs is the Joint Photographic Experts Group jpg or jpeg extension (.jpg). The jpg format reduces the size of the original image file without losing essential information. An important downside to the use of the jpg format is that every time you open and save an image, some detail is lost. Therefore, (and this is important!!) once you take a photo that you are happy with, you should leave it intact. If you need to modify the photo in any way -- cropping it, adjusting the color and contrast, resizing it etc. -- follow this procedure:
- Open the original file of the photo that you want to modify. Before you make any modifications, make a second version of the file by clicking on the "save as" option (this is usually in the "File" menu).
- A "save as" box will pop up on your screen. In the "file name" area, enter a different file name than that of your original photo.
- You can now edit or modify this new file in any way that you wish without fear of damaging the original photo file.
For example, let's assume that you have a photo of a family birthday party that is perfect in all respects except that Uncle Bobby is quite prominently picking his nose. You would love to be able to crop Bobby out of the picture, but you don't want to degrade the quality of the original photo. If the original photo was named 06051101_bday.jpg (to indicate 5/11/2006 birthday), you could make a second version using "save as" and call it 06051101_bday_nobob.jpg) before you edit the image. Once you "save-as" the file, you can cut Bob out of the image and then "save" the image without damaging the original that you may someday want to use at Bob's 80th birthday roast.
Image Quality
The quality of the .jpg image that you save on your computer is related to the compression level that you select when saving the image. Most photographic software packages provide a range of compression or quality levels that you can select from. In the example below, high, medium and low quality images were saved (using the "save as" command) from an original to illustrate the effect of saving images at different .jpg compression settings. Note the different sizes of the files associated with each image. Click on the thumbnail image to view the full size image. To see the effect of image size and compression level on the quality of the image, compare the leaf edges and the Bipolaris lesions on the bermudagrass leaves in the 3 version below.
 |
26 KB image saved using "low" quality jpg setting original photo was 2,666 KB |
 |
37 KB image saved using "medium" quality jpg setting original photo was 2,666 KB |
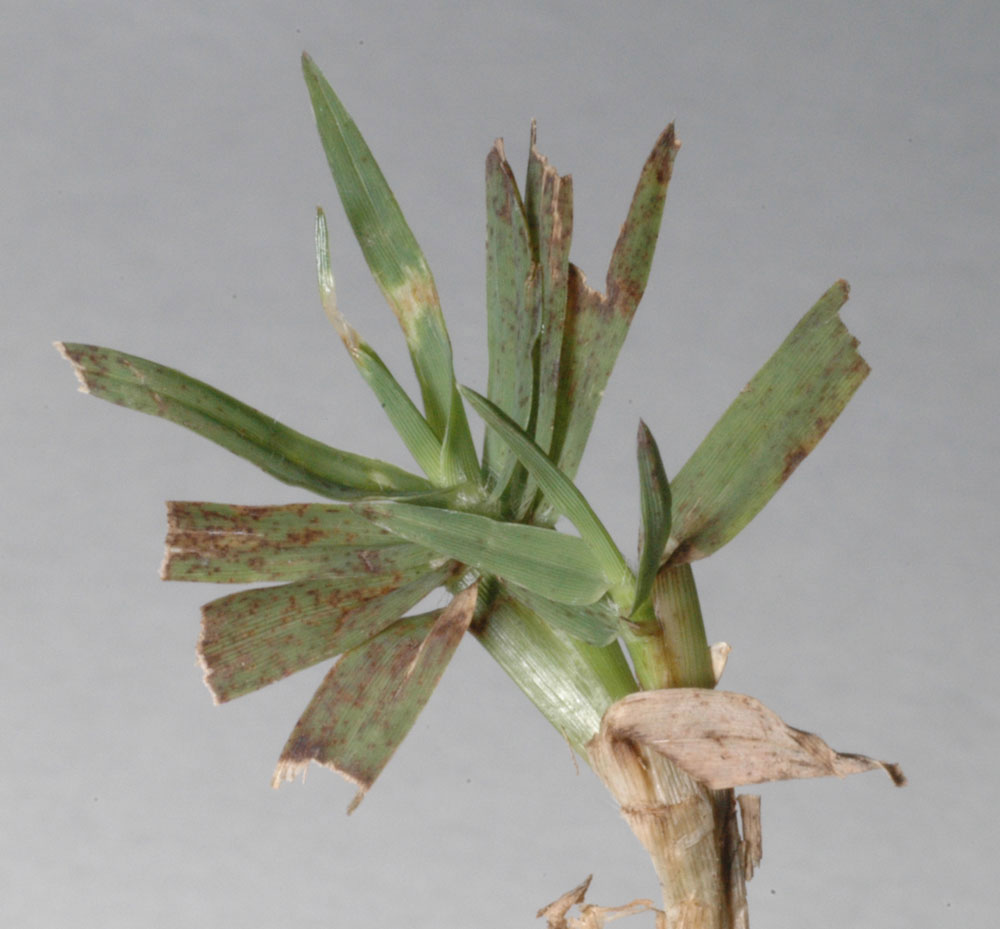 |
94 KB image saved using "high" quality jpg setting original photo was 2,666 KB |
The guidelines below will help you generate images that are sufficiently high quality for use on the web (if you want to print your photos, higher resolution is needed - use the highest resolution on the camera and use no compression during the save-as process. Normally at least 300 dpi resolution is needed for high quality print)
- Never edit your original photo - always "save-as" before editing
- For email and web communication, keep images at less than 200 KB. For people who have dial-up access, keep image size less than 64 KB.
- Size images to between 500 and 1000 pixels (px) for the largest dimension of the image
- Compress to desired level during the "save-as" process and check to be sure that the desired detail is still present in the final image
Factors to consider when taking photos
Digital cameras operate well in automatic or program mode. However, when photographing turfgrasses, there are some tricks for obtaining good images that require use of manual controls.

White balance: One of the first steps you should take in preparing to take a photograph is to check to be sure that the white balance matches the current lighting conditions (full sun, shade, overcast, flash, incandescent, fluorescent). In many cases, setting the camera to automatic white balance will result in capture of an acceptable image, but improved images will be obtained if you properly set the camera white balance. Click on the thumbnail image above to view an enlarged image of the impact of white balance on color. For example, in overcast conditions, the light that reaches the grass is more blue compared to full sun. The light that reaches the grass during early and later hours of the day is warmer - it contains more red.
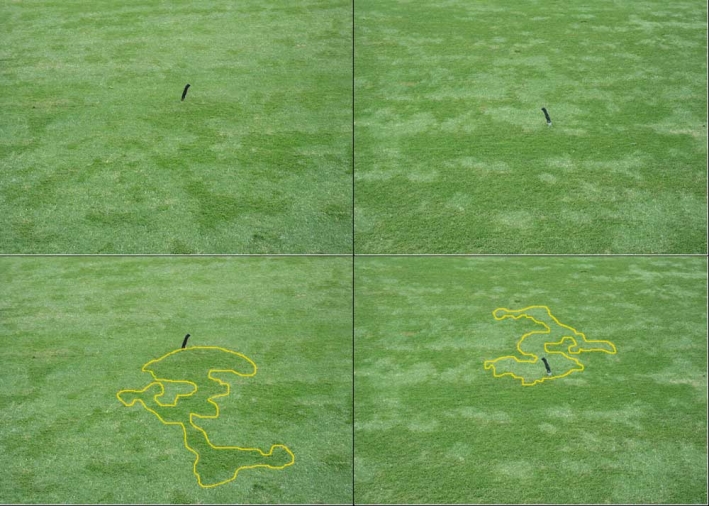 Sun angle can play tricks on your eyes and on the image that the camera captures. The composite image to the right illustrates the appearance of "grain" in hybrid bermudagrass. The dark object is the handle of a knife stuck into the turf. The images on the left versus those on the right were taken from opposite directions aiming toward the knife. In the bottom pair of images, the same area is outlined in yellow to illustrate how differently turf can look, depending on where you stand and how the light hits it. In other words, in order to understand what you are seeing and photographing, always view the turf from several angles before taking your photo
Exposure is controlled by four factors:
- Amount of light coming into the lens
- Sensitivity of the camera's sensor (ISO)
- Aperture (f-stop) setting
- Shutter speed
We generally do not have much control over how much light is coming into the lens, unless we are using supplemental lighting such as a flash. Therefore, the important factors are ISO, f-stop, and shutter speed. Each of these will be discussed below.
ISO is a measure of the sensitivity of the sensor in the camera and it is frequently adjustable. For low light conditions, ISO 200 or lower should be used. For situations where you are trying to stop motion (for example, when it is windy and objects are swaying in the breeze), the sensor is set to high ISO values (400 or higher). More expensive cameras provide a wider range of ISO values to allow photography without the need for supplemental lighting (in low light conditions) or to stop fast moving objects.
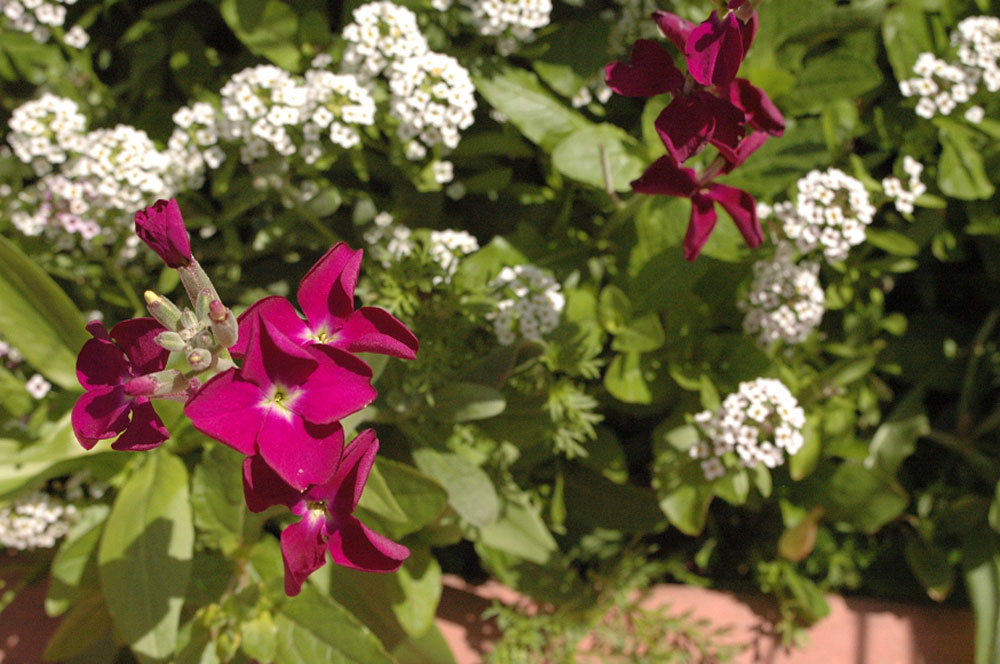
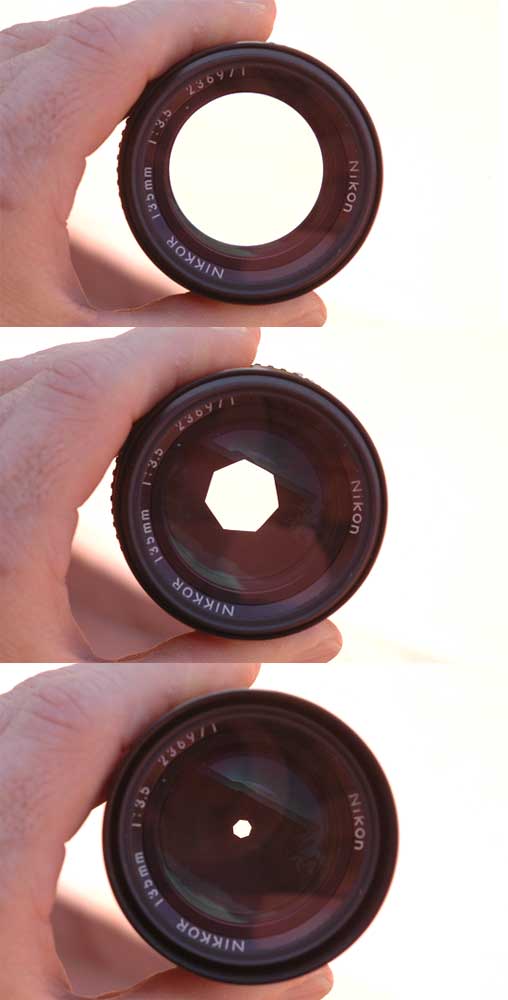 F-stop is simply a measure of the lens iris opening, or the aperture. The number represents the ratio of the focal length of the lens divided by the size of the iris opening. F-stops are frequently noted as a ratio such as f/16. The larger the f number (16 in this example) the smaller the opening, the less light will pass through to impact the sensor. The benefit of a small iris opening is that the depth of field is greater compared to a larger opening. Alternatively, small f-stop numbers indicate a wider aperture opening, more light coming through the lens, and a lessened depth of field. Click on the photo to the right to see how the aperture changes as the f-stop is changed. The table below illustrates the the differences caused by different f-stop settings and the resulting changes in depth of field as the iris opening changes. Note that as the iris opening decreases from f/4.5 to f/29, the shutter speeds (see below) were increased from 1/5000 sec to 1/160 sec to compensate for the reduced light that enters the lens.
 |
The iris opening is f/4.5. Note that the red flowers are in focus but the background white flowers are out of focus. The shutter speed was 1/5000 sec. | |
 |
The iris opening is f/8. Note that the red flowers are in focus and the background white flowers are slightly out of focus. The shutter speed was 1/2000 sec. | |
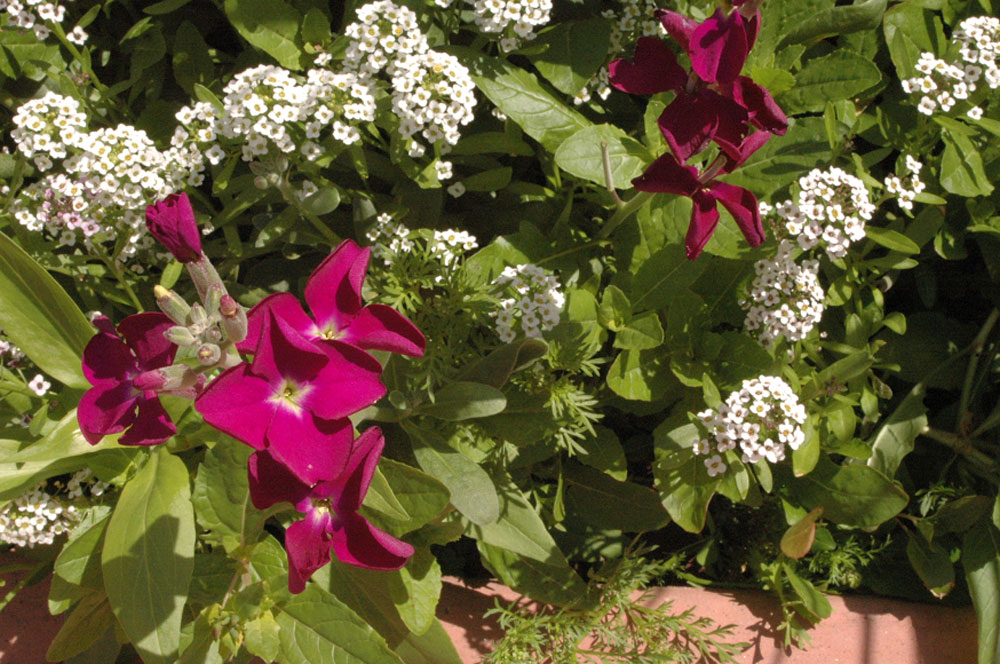 |
The iris opening is f/29. Note that both the red flowers in the foreground and the white flowers in the background are both in focus. The shutter speed was 1/160 sec. |
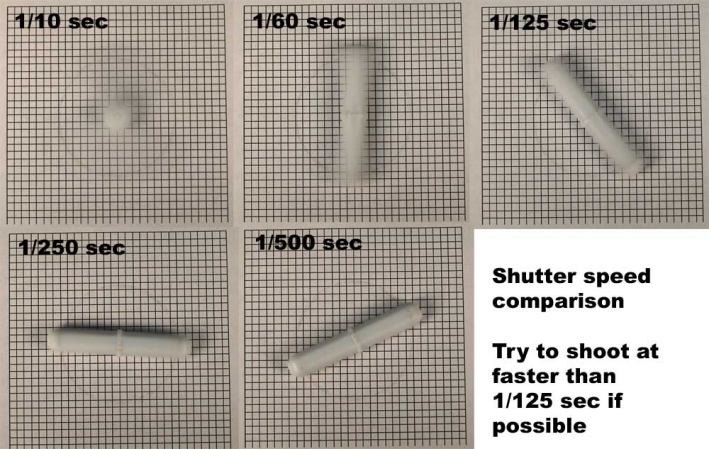
Shutter speed regulates the amount of light that is collected by the sensor after the light passes through the lens. Conventional film cameras had a physical barrier between the lens and the film that acts as the shutter, but many digital cameras operate by turning the sensor on and off for the designated period of time without the need for a shutter. The longer the shutter is open (or sensor is turned on), the more likely that movement of the subject will be detected and the more likely it is that the image will be blurry. Click on the thumbnail above to view a composite image that illustrates the impact of shutter speed on image quality when the subject is moving. Slow shutter speed can be used artistically to improve a photograph to emphasize movement. In most cases, however, fast shutter speeds, such as 1/125 sec or faster (1/250 sec, 1/500 sec etc) will provide an improved photo. If the lighting is low and fast shutter speed can't be used (because fast fast shutter doesn't allow in enough light), check the camera ISO setting to see if it can be increased to be more sensitive to light and to allow a faster shutter speed. Also check to be sure that the aperture is open to allow the maximum amount of light as discussed above. For shutter speeds below 1/125 sec, consider using a tripod to steady the camera.
Composition
For the artist, composition plays a major role in the visual impact of a the photograph. Though composition isn't as critical when communicating technical concepts, the best technical photos manage to combine both artistry and accuracy in the same picture. In other words, it is worthwhile to pay a little attention to composition - just don't let it override the considerations of focus, exposure and color described above.
There are many web sites that can help you with composition but we will mention one simple guide, the rule of thirds. When taking a photograph, the main subject of the image should be placed at one of the intersecting points where the image is broken into thirds vertically and horizontally.
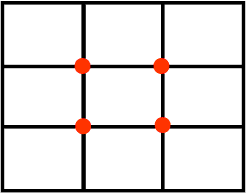 |
The red dots illustrate where the main subject of the photograph should be placed to improve the composition of an image. | |
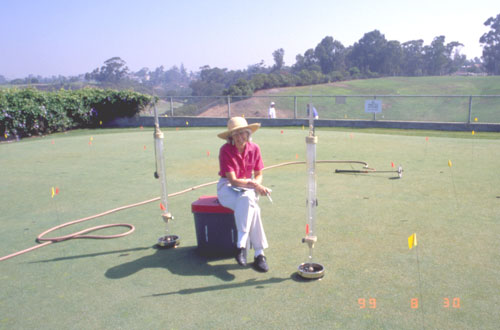 |
With the main subject centered in the image, the photograph does not appear very interesting (though in real life, we hear that she is actually quite fascinating!). | |
 |
Even with the use to the rule of thirds, the image is still not THAT interesting but the photograph has been improved by cropping the image to result in placement of the main subject over one of the rule of thirds locations. |